Anthropometric Data

Wednesday, March 20, 2013

Squash Lasagna with Tomato Sauce and Carrot Top Pesto


After a long day of work, I was finally able to relax. And make LASAGNA! It's one of my favorite dishes to prepare....and eat. Who doesn't love the complexity of a something so saucy and delish?

Now, do not get frightened by this post; it comes across as intimidating, but need not be. In fact, you could make just one component of the lasagna. I mean, carrot top pesto or tomato sauce is extremely versatile. Put it on noodles, quinoa (quinoa pesto is tasty, just ask Babs), raw veggies like radish...The possibilities are endless, really.

Now, to being:

Squash Noodles:
prepares 1 lb pasta, fresh

3 cups flour
2 pinches of salt, kosher
2 eggs
1/2 cup roasted carnival squash
1 Tablespoon water
2 tablespoons olive oil

Preparation:
When preparing the pasta, keep in mind it's no different than a simple pasta recipe but without the squash. The only additional steps are to roast and puree the squash (allow to cool before use). Make a well with the sifted flour and salt. Crack both eggs into the well, as well as the squash and water. With a fork, slowly incorporate the flour into the egg mixture. As it begins to form a ball, add the oil. Knead for 8-10 minutes and adjust accordingly with flour and water. Allow to rest and cover for at least 30 minutes at room temperature.

With your pasta roller, roll out 3 sheets (the size of the pan) for the bottom layer to number 4. The remaining lasagna noodles are best rolled to number 5. Dry and boil for about three minutes. If you don't have a drying rack, improvise. See the picture below for inspiration. Cool and lay flat (gently brush oil to keep noodles from separating).


To make it more fun, sip on a beautiful Pinot Noir and take your time. This isn't a race. Enjoy yourself, and your food.


Carrot Top Pesto:
Prepares about 5 cups depending on desired consistency

1/2 cup toasted, pepitas
3/4 cup dried pie pumpkin seeds
3/4 cup toasted sprouted walnuts
2 cups packed carrot tops (stems removed)
6 cups fresh spinach
1 cup fresh basil
3 ounces of grated Pecorino Romano cheese
8 roasted garlic cloves
1/2 cup grapeseed oil
1/2 cup olive oil
1/2 cup water
Salt and Pepper to taste

Preparation: Toast all nuts/seeds and blend in processor. Add garlic and pulse, careful not to pulse too much. Proceed and add spinach, basil and carrot tops in batches. Then add cheese. Very slowly pour the oils into the mixture as you process. Add the water the same way, streaming it into the vibrant green blend. Add salt and pepper to taste.

Words of advice:
1.You don't want a smooth pureed sauce, but rather with a rough texture, so don't over process. Pulse the ingredients instead of allowing the machine to run continuously.
2. One may substitute the pie pumpkin seeds with more pepitas if you don't have them on hand. I reserved the pumpkin seeds when I was roasting the meat of the pumpkin and let then dry out at room temperature for about 5-7 days. Then I toasted them in the oven for 5 minutes at 350F.

Tomato Sauce:
Yields 3 1/2 quarts
1/4 cup olive oil
1 cup onion, diced
2 - 28 ounce cans of San Marzano tomatoes
4 ounces tomato paste
5 cloves garlice
1 pinch smoked Spanish paprika
1 bay leaf
1/4 cup dried basil

In a sauce pot, sweat onions in 1 tablespoon of olive oil. Add remaining ingredients and allow to simmer for several hours. Remove the bay leaf and from heat. Puree with an immersion blender and adjust seasonings.

Vegetarian: Squash Lasagna
Prepares one large 9x13" pan

1 eggplant, flame roasted on stove top then pureed (skins removed)
1/2 kabocha squash, cubed and roasted (350F for 45 minutes with 2 T. oil, salt and pepper)
16 ounces ricotta
2 ounces Pecorino Romano
3 cups shredded mozzarella
Pesto
Tomato Sauce

Heat oven to 375F
Oil the lasagna pan and layer the thicker (#4) lasagna noodles on the bottom. Spread the roasted eggplant on the noodles. Follow with cubed kabocha squash. Sprinkle shredded mozzarella cheese, add next layer of lasagna noodles. Spread pesto onto, followed by another layer of squash. Ladle tomato sauce, then top with noodles. Next comes more cheese, the ricotta. Then yet again, a layer of noodles. Put a thin layer of tomato sauce on top the noodles and sprinkle Asiago Romano to finish.

Also, I'd like make a special shout-out to Clara. She was kind enough to wash the dishes as I prepared the lasagna during the entire preparation process.

Friday, April 20, 2012

Ginger Tofu


Yummy yummy. The sweet pickled ginger brightens the entire dish and pairs beautifully with the celery. Plus it looks so pretty, does it not?


First, press the tofu between folded tea towels and a heavy weight to press water from the tofu. After 40 minutes, begin cooking your short brown rice. While the rice is cooking, slice the onions into half moons. Heat a saute pan and once warm, add oil and begin cooking the onions. Once translucent, add batons of celery (preferably peeled). Add salt, pepper, and mint flakes. Slice a wild assortment of mushrooms and add to pan. Cook mixture until mushrooms are firm, not mushy. Deglaze the pan if necessary with just an ounce or so of pickled ginger juice into pan. Add rice wine vinegar, black sesame seeds, freshly grated ginger and minced garlic. Set aside and heat more oil in the pan, add tofu and sear all sides until nicely browned. Add more fresh ginger and garlic, then chives and parsley. By this time, your rice should be done or nearly finished. Last but not least, plate the dish [perhaps like the picture shown here] and EAT EAt eat !

3 T. Canola Oil
1/4 onion
3 stalks celery cut into batons
6 cups fresh, wild mushrooms
1 T. Black Sesame seeds
1 1/2 tsp. mint flakes
few pinches of salt, to taste
pepper to taste
3 T. ginger fresh
2 large cloves garlic
1/8 c. rice vinegar
1 1/3 c. short brown rice
14 oz. extra firm tofu
2 T. fresh chives
2 T. fresh parsley
1-3 ounces pickled ginger juice
pickled ginger to taste

Thursday, March 1, 2012

The Art of Sausages

Well, it's not my first time making sausages, but it mind as well. Literally, it's been nearly 6 years since I made sausage. One would think it to be hard, but in fact, it's quite the opposite. The only thing keeping me from making my own from scratch was the time and commitment it takes to prepare them from beginning to end. But after this batch, I know time will no longer stop me.

First and foremost, make sure you have all the necessary equipment, including the sausage stuffer attachment :)
Here's what you'll need:

meat, roughly chopped in 1" (25mm) cubes or smaller
spices [I did two blends, one a classic Italian blend of oregano, toasted fennel and red pepper flakes, and the second with lemon pepper, thyme, pepper, and other mediterranean herbs----I forget]
casings
water
grinder, parts, plus attachments (keep in freezer until ready for assembly)
stand mixer (if necessary)
bowls
scissors
cutting board
knife
camera [optional, don't you want documentation?]

Once you have all your materials and you're ready to start, prepare your meat by evenly incorporating the spices. Put in the freezer so that it nears the point of freezing. This will yield best results and is easier to work. Select your grind (the plate) and assemble the grinder accordingly to the manufacturers instructions. When choosing your plate, it's best to use a coarse size with tender cuts, medium with tough and fine with sinewy cuts of meat.
Before you begin, make sure the threaded retaining ring is snug (not too tight). Now, you're ready. Carefully place the meat inside the grinder using the pushing stick to force and guide the meat through the hopper. And there you have it, freshly ground meat. As you continue, you may encounter a few problems where the sinews wrap around the knife (blade) causing a stoppage. If this occurs, unplug the machine and carefully disassemble. While fixing the grinder, remember to place your meat in the freezer. The cause is usually because of a loose ring or the meat not being cold enough.


Once you are finished grinding, take a small amount of the meat mixture and form into a small patty. Cook thoroughly and taste for texture, spice, and overall taste. Adjust the mixture as you see fit. You may even have to put it through the grinder one more time if the texture wasn't to your liking. Let's say the texture was too tough, then you should put it through once more with a smaller plate/holes.


Alright, you're done mixing the meat. Put in the refrigerator until you've assembled the funnel end for sausage stuffing. It was at this point that I realized I didn't have this attachment and was therefore prohibited from moving any further. I spent the rest of the night making phone calls to all the local kitchen and hardware stores. After two hours of phone calls and being put on hold, I managed to find one. It turns out that sausage stuffing attachments are hard to come by. Most order them on-line. The following day, I had Gil pick up the funnel. We picked up where we left off and went back to work. We were finally able to assemble it properly with all the attachments.

Side note: The casings are sold in concentrated brines of salt water, so I recommend several rinses before using them.


Slide your casings onto the funnel and tie a knot at the very end. WIth your scissors, or a knife, create a hole for air to escape. Turn on the machine (be sure the machine is assembled properly) and place your meat in the hopper. With the other hand, guide the sausage along. When the length is to your liking, twist off right to left (always in the same direction). Continue this process until you've no more meat to stuff. Tie off the end, and there you have it. SAUSAGE!!!

Wasn't hard, right? Just time consuming, but worth it most definitely. Allow to rest in the refrigerator and prepare for a feast centered around your beautiful creation.

Wednesday, February 29, 2012

Where does the time go?


Hi all,

I'm back..........Lately I have been so crazily busy, and now that I'm done applying to Dietetic Internships, I have more time on my hands. Back to cooking, photographing, blogging and the like, right? Of course! Also, I would like to mention that I taught myself how to knit. Merima was there to guide me a bit, but I can finally knit myself a simple cowl. I'm oh so thrilled!

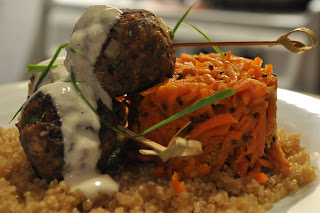
Today after work, I biked home through the 22 mph winds with 40 mph gusts. It was wretched I tell you. Upon arrival, my hunger became apparent. Instantly I knew what I would prepare for my dinner. Lamb skewers with quinoa and a side carrot salad [cashew yogurt dressing].

I first mixed the lamb skewers:
black cumin
sambar
salt
pepper
dried mint
fresh parsley
minced onion
cumin
bread crumbs
egg
lamb
mustard

After, I let the meat rest and shaped them into balls [refrigerate]. In the mean time, I thawed lamb stock for the quinoa. When preparing grains, I find it more flavorful to use various stocks to give greater depth to the food. Once thawed, I started cooking the quinoa and began preparing the carrot salad.

To save time, I used my food processor to shred the carrots. FIrst, heat the pan and temper the oil with mustard seeds, curry leaves if you have them, and dried chilies. When the mustard seeds begin to pop, add the carrots and saute. Mix in curry powder, cumin, and tumeric. After a few minutes, add a small amount of yogurt and keep at a simmer. Be careful not to heat too much or the yogurt will curdle giving an unpleasant texture and appearance.

In a frying pan, cook your lamb so that each ball has a nice brown coating. [Finish in the oven if necessary.] Lastly, swirl cashew butter into plain yogurt. I prefer to have a ratio of 1 cup yogurt to 3 tablespoons cashew butter. Add salt and herbs of your liking.

Try it at home, and let me know what you think.

Wednesday, November 2, 2011

Ko, the menu


Ok, here you are folks, the menu. I should first mention that since no cameras were allowed, I had to wait until after the meal to write down everything I ate. Thus, Gil and I raced to a coffee shop to write down what we could remember, so use your imagination.

Oyster: jalapeno

Trio course [all separate, left to right, 1-2 bites a piece]:
Lobster bisque, basil
Poached Quail Egg, hollandaise, chiccharones
Dry Aged Beef Tartare

Quatro course [4 types of sushi grade fish on a square, partitioned plate, order starts top left and eaten clockwise]
Marinated Chives, crisp scales, (fish? can't remember type unfortunately)
Mackerel, red cabbage pickled, apple
Fluke, bean paste cherry bomb
Scallop with pablano

Vegetable Crudo [again, three separate sides, partitioned on a skinny rectangular plate, left to right]
Turnip braised, turnip green puree, fried mustard seeds?
Cauliflower roasted, fish sauce
Feral eggplant in dark miso

Egg Souffle: benton's bacon dashi

Bento Box:
Grilled sushi rice in bacon
Halibut consome
Shaved brussels sprout salad in mustard oil
Pork spare ribs, grilled mild green pepper (not sure on variety, spicier than a green bell, but less than a pablano, size of 2")

Wild Mushroom Salad:
Maitaki, chantrelles, king trumpets, mustard sauce

Matsutake Ravioli: chive butter sauce with fried buckwheat

Matsutake tea with french toast maple, brown butter

Lobster salad: lobster mushrooms, white fungus, tumeric.....sauce

Charcuterie: Chicken pate, burned onion sauce, duck proscuitto, head cheese, pickled mustard seeds

Elysian Farm Lamb [two parts]
Lamb in pistachio puree salsify, burnt onion powder
Lamb neck cassoule with poached pistachios

Goat Cheese Sorbet: shiso

Pineapple Sorbet: root beer (house made), dried pineapple, dehydrated pineapple skin, micro cilantro

White Miso Sorbet: black puffed rice, sushi rice, rice waffle cone

....and that's all, at least what I remember :)
After a feast, we walked around New York City awaiting our second most extravagant meal, which was to be eaten three hours later at Wd-50. More to come on Chef Wiley.

Happy Drooling

Tuesday, November 1, 2011

Ko, Momofuku

East Village
163 First Ave., New York, NY 10003
nr. 10th St.

On a whim I decided to fly to New York City for a foodie adventure. After I purchased the plane tickets, I told my friends I wanted to get a reservation at Ko, a restaurant I've been longing to eat at under Chef David Chang. If you've read previous blog posts, you may remember my plug for his pork steamed buns.

Anyway, I was told by several chefs how difficult it would be to obtain a reservation with Ko. I even heard rumors that his own parents have been turned down, but who's to say that's actually true. Thus, my chances were bleak. But then, the morning before our departure, I decided to try one last attempt for a lunch reservation (more expansive than dinner and only offered on weekends). To my amazement, an opening appeared! It took me several minutes with computer glitches, but I managed to get two open seats for lunch!!! I immediately telephoned Gil and told him the good news. At first, no one believed me, especially since it's known how unlikely it is to eat there. Some people have to slave away at the computer and continuously check. Bon Appetit ranks Ko as the 9th toughest restaurant reservations in the USA.* With 12 seats at Ko and reservations only in a week advance, it's no wonder why seats are booked and difficult to obtain.

When the day finally arrived, we walked into Ko with great anticipation of indulging in one of the most amazing meals. Chef Michael Carlson, the executive chef/owner of Schwa, was nice enough to put Gil and myself in touch with one of Ko's Chefs, Jonathan Ory. He was kind and made sure we enjoyed ourselves [the following day he took us to DBDG, Daniel Bouldud's restaurant], even giving us take home treats of nagori wrapped vegetables and rice with korean spices.

The meal was unlike anything I've ever experienced, Japanese/Korean/American with unexpected flavors of burnt onion on salsify and house made charcuteries. In my next post, I will write out the menu with little detail. No cameras allowed, sorry folks.

Until then, keep those saliva glands producing. The best [in detail] is yet to come.


*http://eater.com/archives/2011/07/29/are-these-the-eleven-toughest-reservations-in-the-us.php, website for listing of toughest restaurant reservations in the USA.

Thursday, September 29, 2011

Sweet Potato with Herbs de Provence Buns


Yesterday was my day, so I couldn't resist preparing something new and exciting, so I went to the store with the intention of buying Idaho's for rosemary potato bread. But when I got to the store, the sweet potatoes looked more appealing and inviting, so I changed my mind and grabbed one.

In New Zealand, kumara is the Maori word for sweet potato and is actually a different variety from those grown in the United States. Kumara is known to be healthier than most other types of potatoes. They are an excellent source of vitamins and minerals, are virtually fat-free, cholesterol-free and very low in sodium. Kumara have more fiber than oatmeal and provide many essential nutrients, including vitamin B6, calcium and iron.

Unfortunately, I do not have access to kumara, so I grabbed the only variety of red sweet potato I could find. Oh well, right?

Meanwhile, before I left for the market, I started a biga, which is a starter dough or pre-ferment. In Italy, nearly every pre-ferment including wild yeast or soudough, is called a biga. So if you are making a recipe from another source that calls for biga, make sure you check to see exactly what kind of biga it requires. In this recipe, biga refers to the particular ratio of ingredients:
11.25 ounces unbleached bread flour
.055 ounces instant yeast
7-8 ounces water, at room temperature

After 2-4 hours, the biga has fermented and can be used immediately; however, some prefer to git it an overnight retarding (in the refrigerator) to bring out more flavor. It is important to know that a pre-ferment's main purpose is to improve flavor and structure, so the overnight will improve the overall quality.

The base recipe I used was from The Bread Baker's Apprentice by Peter Reinhart. The only changes were the following substitutions:
1 cup sweet potato puree (in place of mash potatoes)
2 T herbs de provence (in place of rosemary)

When all was said and done, the bread turned out beautifully. The only adjustment I would make would be to steam the oven in the initial baking process. After putting the bread into the oven, spritz water a few times to create steam; this will result in a wonderful crust. Try it, you'll love it!